
Appearance
Checkout & Shipping Labels
After Shippo is connected, staff can price shipping, buy carrier labels, and record shipments directly from a project. This page covers that day-to-day flow.
Open a project and scroll to the Shipping card. What you see depends on how the order is set up, but the common actions are: choose a shipping method, optionally set a customer's carrier account, and generate a label.
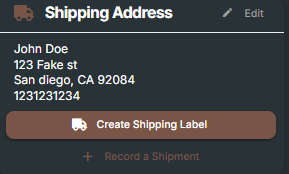
Editing the shipping details
Click Edit on the Shipping Address card to open the shipping controls. From here you can:
- Edit the recipient's address, and switch between Pickup and Shipping.
- Change Shipping Method to switch the carrier or service level (covered next).
- Set Customer Shipping Account to bill the customer's own carrier account (covered below).
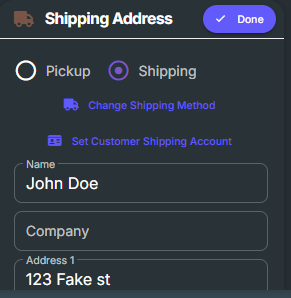
Once a customer account has been set, that button reads Edit Customer Shipping Account. Click it to reopen the dialog and change the account number or ZIP. Click Done when you are finished editing.
Choosing or changing the shipping method
Click Change Shipping Method to see live carrier rates for the project's shipping address (the same live rate list shown in the Generate Shipping Label window below).
- Pick a rate and confirm. The project's shipping fee and totals update to match.
- The rate the customer originally chose at checkout is marked, so you can see what they picked.
TIP
You can change the method after checkout. The rate staff pick here is the one that wins, so it is safe to switch carriers or service levels before you buy the label.
Optional: Bill the customer's own carrier account
If this order should be billed to the customer's own UPS or FedEx account (see Shipping Setup to enable this), click Set Customer Shipping Account.
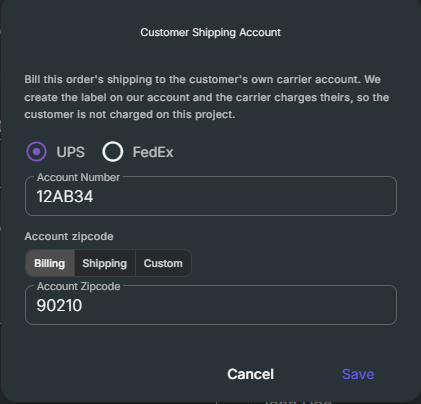
- Choose UPS or FedEx.
- Enter the customer's account number.
- Set the account ZIP. The toggle fills it for you from the order:
- Billing uses the billing ZIP on file.
- Shipping uses the shipping ZIP.
- Custom lets you type one. Typing in the field always switches to Custom.
- A red note appears if the chosen source has no ZIP on file, so you know to switch or type one. (UPS needs a ZIP; FedEx ignores it.)
- Save.
Once set, the shipping buttons change color and text to make it obvious the customer's account will be billed, for example Create Label · Bill Customer UPS Account. To change the account number or ZIP later, click Edit Customer Shipping Account to reopen this dialog. To clear it entirely, reopen the dialog and click Remove.
Generating the shipping label
Click Create Shipping Label (or Generate a carrier label). The Generate Shipping Label window opens with live rates.
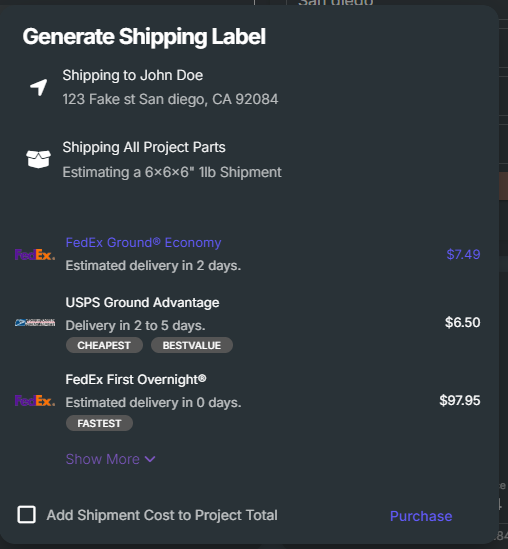
- The cheapest rate is preselected, so you can review and buy in one step. Pick a different rate if you like, and use Show More to see the full list.
- Add Shipment Cost to Project Total: check this to add the shipping cost to the client's invoice, so the client pays for shipping. Leave it unchecked when the customer's own account is being billed, otherwise you would charge them twice.
- Click Purchase to buy the label. It opens in a new tab to print.
Purchasing buys a real label
Clicking Purchase creates a real label. On a normal order it spends real money on your carrier account. On a customer-account order it bills the customer's carrier account. Double-check the rate and the billing before you click.
Reading the billing signal
On a customer-account order, the Purchase button tells you exactly who gets charged:
- Green "Purchase · Bills customer UPS account": the label will bill the customer's account. Good to go.
- Red "Purchase (not on customer account!)": the selected rate would bill you, not the customer. Stop and check your setup (see Shipping Setup) before buying.
After a successful purchase you will see a confirmation of who was billed. If prices show the carrier cost with a note that your invoice charges $0, that is the customer-account order working as intended.
The finished shipment card also keeps a permanent Billed to customer's UPS account badge under the tracking status, so anyone looking at the order later can see at a glance that the shipping went on the customer's account and not yours.

Customer-provided (dropship) labels
Some orders ship on a label the customer provides. In that case the Shipping card shows an Awaiting label state and an upload option instead of the buy-a-label buttons. Upload the customer's label there when it arrives. You can switch an order between dropship and a carrier label at any time with Change Shipping Method.
Recording a pickup or manual shipment
Not every shipment needs a Shippo label. Use Record a Shipment (or Record a Pickup) to log a tracking number or a customer pickup by hand, without buying a label.
Troubleshooting
No rates, or an empty list: the window shows the reason at the bottom. Usually an incomplete shipping address, or, on a customer-account order, a problem with the account or carrier setup. See the troubleshooting notes in Shipping Setup.
Purchase button is greyed out: no rate is selected, or no rates came back. Pick a rate row; if the list is empty, read the message at the bottom of the window.
"Missing shipping label ID": no rate was selected. Pick a rate row first, then Purchase.