
Appearance
Creating Projects
Creating Projects
In Formfactories, a projectA collection of parts, quantities, materials, job files, client information, and pricing (if applicable). is created the moment a clientAny non-staff user of the platform. These are the people your factory serves. Also called 'customers'. submits an input formThe interface clients or staff use to submit models and details that create a new project. This form can be customized or you can use the default one provided. — or when a staff memberAny user with staff permissions in the platform (set in the Staff and Teams section of Settings). These are the people who manage the factory and its operations. clicks the New Project button.
Shareable URL
Every projectA collection of parts, quantities, materials, job files, client information, and pricing (if applicable). has a single, shareable URL. Whether you're a clientAny non-staff user of the platform. These are the people your factory serves. Also called 'customers'. or a staff memberAny user with staff permissions in the platform (set in the Staff and Teams section of Settings). These are the people who manage the factory and its operations., the link will always work — the interface simply adapts to your role. Clients see just what they need. Staff members see the full workspace. This makes it easy to collaborate, share updates, and give access without worrying aboutnp permissions or redirects.
You can kick off a project by uploading files — such as modelsA digital representation of the physical object that will be created (STL, STP, etc.). — and immediately begin calling out things like materials, properties, and quantities. If you'd like to dive straight into that, just drag and drop a 3D file into your project, and skip down to the Models, Specs, and Counts section on this page.
Meanwhile, we'll cover everything in a project from the top to the bottom.
Project Header
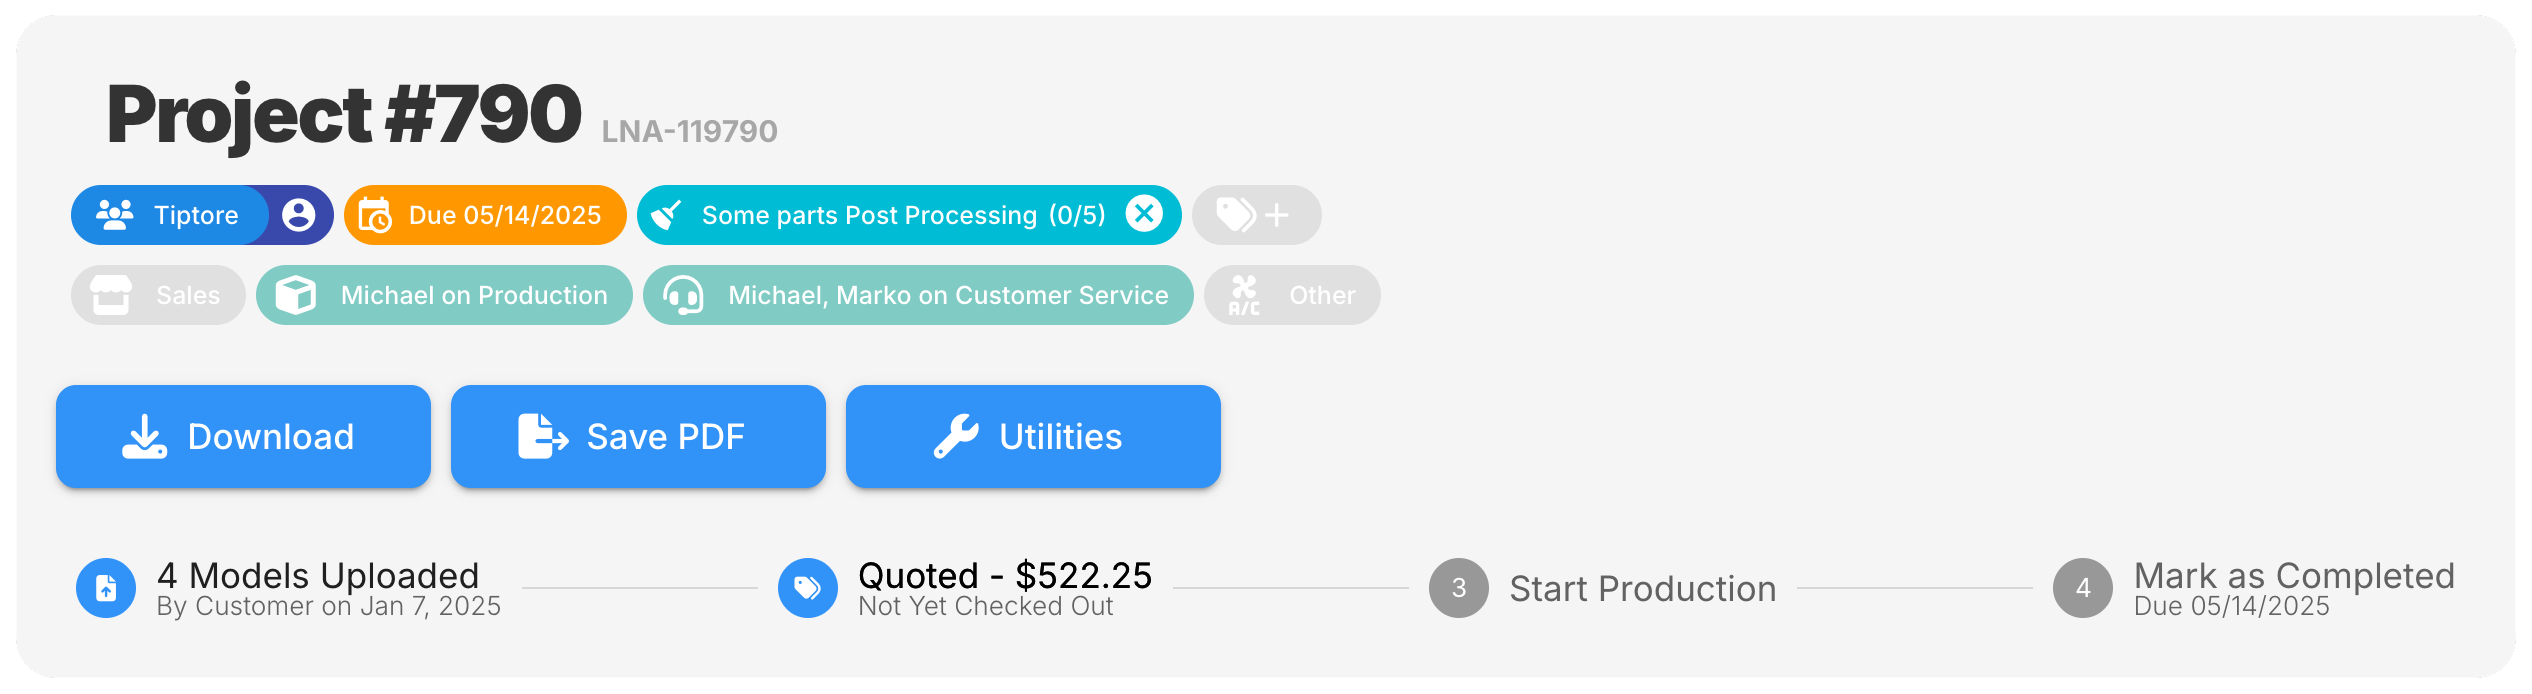
The Project Header gives you a high-level overview of critial items, right at the top of the screen.
At a glance, you’ll find the project numberA unique identifier assigned to each project. Used to locate the project via quick search, and displayed on all paperwork such as quotes, packing slips, and invoices., organization, client, due date, tagsA customizable label used to organize projects and models. Tags can be applied at the project or model level and may include additional functionality, such as counters for tracking progress., team assignments, and current project status — along with direct access to project utilities like downloads, PDFs, and more.
Project Number
Each project begins with a bold, abbreviated project number (e.g., Project #790), followed by the full number (e.g., LNA-119790). This number appears on all relevant paperwork — including quotes, packing slips, and invoices — and can be used with the Quick Search tool to instantly locate the project.
You can edit the project number by hovering over it.
Organization and Client
To the right of the project number, you’ll see the name of the associated organizationA group that multiple clients can belong to — such as a company, department, or classroom. Useful for managing related users and their projects. (e.g., Tiptore). Clicking it navigates to that organization’s page.
Next to it is the individual clientAny non-staff user of the platform. These are the people your factory serves. Also called 'customers'. linked to the project. Clicking their icon or name will take you directly to their page.
Due Date and Tags
The due dateThe completion date for a project, generally based on the lead time and the date a project enters production. Used to prioritize scheduling and production. appears as a bright label (e.g., Due 05/14/2025) and reflects the date selected in the Project Info section.
Next to the due date are tagsA customizable label used to organize projects and models. Tags can be applied at the project or model level and may include additional functionality, such as counters for tracking progress., which are incredibly powerful for keeping things organized or created a custom workflow.
Assigned Staff
The second row contains labeled assignments like Sales, Production, and Customer Service, showing which staff membersAny user with staff permissions in the platform (set in the Staff and Teams section of Settings). These are the people who manage the factory and its operations. are responsible for each role. These roles are used internally to keep teams coordinated, and can be configured to fit your operation.
Download, Save PDF, and Utilities
Below the team assignments are three prominent buttons:
- Download: Downloads all modelsA digital representation of the physical object that will be created (STL, STP, etc.). in the project as a ZIP file.
- Save PDF: Opens a dropdown for generating documents like quotes, packing slips, or other paperwork — depending on your Formfactories configuration.
- Utilities: Reveals additional options, including Email Customer, Duplicate Project, Apply Discount, Edit permissionspermissions, Copy Quote Link, and Generate QR Code.
Reminder
Not all Formfactories customers are selling parts. Your interface may look different, but the concepts are the same.
Project Status
At the bottom of the header is a visual status tracker, flowing from left to right:
- New – The default status when a project is first created. Clients see limited information in this stage. Manual pricing and checkout options are hidden, though any instantly quoted parts will still display their prices.
- Quoted (or In Preparation for non-sales environments) – Used when a project is awaiting approval. If pricing is enabled, the status appears as Quoted; if not, it appears as In Preparation. Clients can view pricing (if applicable) and perform a checkout at this stage.
- Production – Indicates that the project is a work in progress. Formfactories’ production features are now unlocked.
- Completed – Marks the project as finished. It is no longer in production, though all records and files remain available.
- Archived – A somewhat hidden fifth status used to fully retire a project from most dashboard views. Archiving is typically restricted by and reserved for managers, giving them the final say on whether a project is truly ready to be filed away — for example, if it still needs to be invoiced or reviewed.
Changing the Status
To move between phases, simply click the status indicator within a project. If you're working from the status dashboard view (outside of the project), you can drag a project from one column to another to update its status.
To archive a project that is Completed, click the Completed status a second time. The status will change to Archived. Click it once more to return it to Completed anytime. Or, from a dashboard view, you can drag the project to the trashcan icon in the bottom-right corner of the screen. Don’t worry — archiving doesn’t delete the project, even if the trashcan makes it look that way.
Project Info
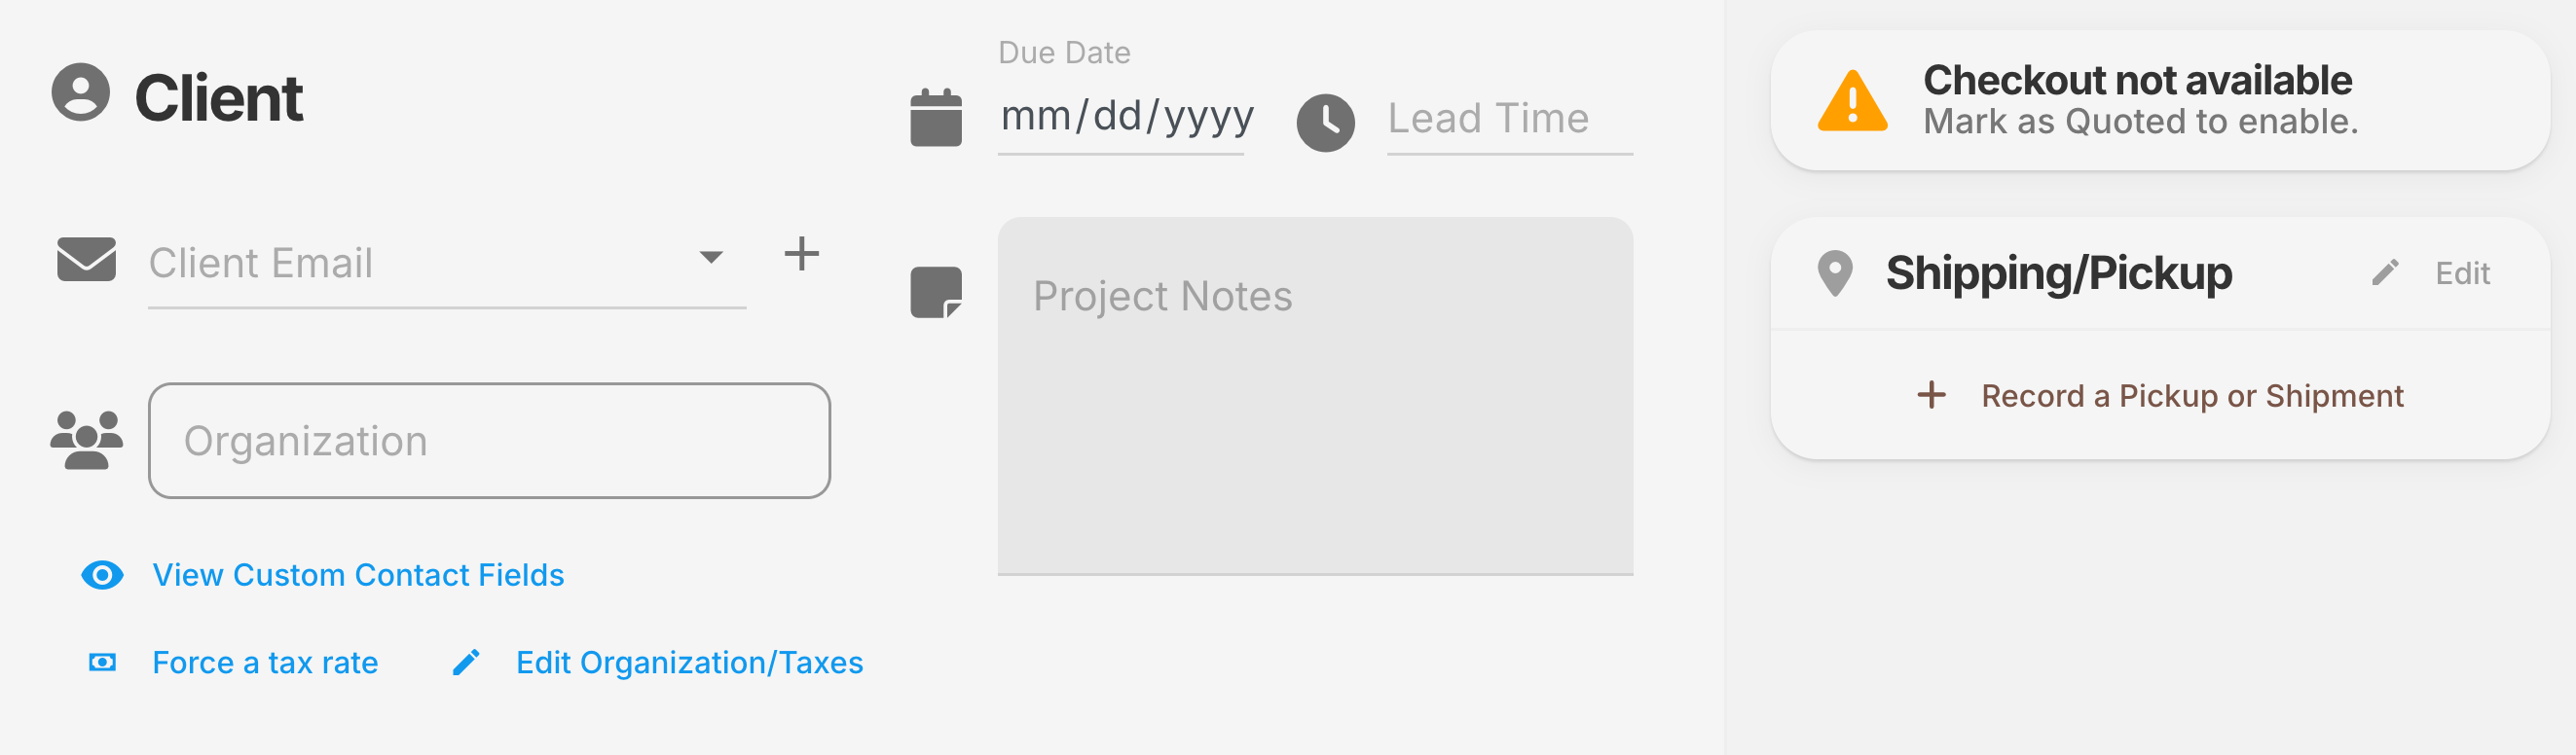
The project information section includes fields like client emailThe email address associated with a client. This is the only required field when creating a new client in the system., organizationA group that multiple clients can belong to — such as a company, department, or classroom. Useful for managing related users and their projects., due dateThe completion date for a project, generally based on the lead time and the date a project enters production. Used to prioritize scheduling and production., lead timeThe amount of time required to complete a project. Lead time is typically used for quoting or planning purposes before a project is approved for production, when a final due date may not yet be set., project notesA private space for internal notes from staff. If a client includes comments while submitting the input form, those will also appear here., checkoutThe mechanism used to finalize a project and prepare it for billing, fulfillment, or delivery. Checkout becomes available once a project reaches quoted status., and shipping informationDetails about how the finished parts will be delivered or picked up — including shipment tracking, delivery method, and pickup records.. Together, these fields establish the project's context and lay the groundwork for clear communication, accurate scheduling, and efficient fulfillment.
Pro Tip
By default, none of these fields are required — but the more information you include, the more Formfactories can do. For example, setting a due dateThe completion date for a project, generally based on the lead time and the date a project enters production. Used to prioritize scheduling and production. will help with production.
Attachments and Job Files
The Attachments and Job Files section appears automatically when your project contains any non-model files. It’s split into two simple tabs:
Attachments
AttachmentsGeneral supporting materials, like PDFs, drawings, spec sheets, certifications, etc. are general supporting materials, like PDFs, drawings, spec sheets, certifications, etc.
Job Files
Job filesA file that gets sent to a machine to make a model (like a .3MF, .gcode, etc.).Learn more → are the files you actually send to a machine — such as.gcode, .3mf, or similar formats. This is what tells the software (and your team) that when you send this to a machine, X models will be made..DjNiNr2I.png)
Linking to Models
Whenever you drop in a file (attachment or job), Formfactories will ask if you want to link it to any existing modelsA digital representation of the physical object that will be created (STL, STP, etc.). in the project.
- Want to link it? Just select the relevant model(s) when prompted.
- Not ready to link? No problem — hit cancel and the file will upload normally without an association. You can always link, relink, or unlink files at any time.
This flexible system makes it easy to keep supporting documents and machine-ready files connected to the models they support — or to leave them floating independently if they are not directly related to models.
Pro Tip
Uploading and linking job files is incredibly powerful, not just for you to have on hand, but also for the software to automate a lot of things for you. We recommend checking out the full Job File guide for a deep dive.
Changing File Roles
Formfactories does its best to automatically identify file roles based on their extension. For example, .stp or .stl files are typically treated as modelsA digital representation of the physical object that will be created (STL, STP, etc.)., and .pdf files usually show up as attachmentsGeneral supporting materials, like PDFs, drawings, spec sheets, certifications, etc..
The defaults are configurable in your system settings, but sometimes a file may need to be manually reassigned. For instance, a .3mf might default to a job fileA file that gets sent to a machine to make a model (like a .3MF, .gcode, etc.).Learn more →, but you may be uploading one that is meant to be a modelA digital representation of the physical object that will be created (STL, STP, etc.)..
If something defaults to the wrong role, simply click the menu and reassign it.
Models, Properties, and Quantities

This section defines what you're making, how you're making it, and how many you need.
Adding Models and Callouts
To get started, simply drag and drop a modelA digital representation of the physical object that will be created (STL, STP, etc.). into the project. Once uploaded, you’ll immediately be able to select a materialThe physical material used to create a model (PLA, ABS, resin, etc.). from the dropdown. Based on your selection, any relevant propertiesAnything about a model that isn't the technology or material (layer height, infill, post processing, etc.). — will appear, each with their own set of options.
Everything you choose is summarized on the right-hand side of the row, so you can easily review your configuration at a glance.
If your pricing is not generated automatically, or if you'd like to override it, you can enter a custom price manually — assuming your account is set up to allow sales. Next, let's explore each area of this section in more detail.
Model Pane
The Model Pane is the leftmost area of the interface. It displays a rendering of the 3D model, or, when applicable, a preview of other supported file formats. Let’s explore all of the features here.
Model Settings and Actions
Lets review everything within the gear icon in the model model pane.
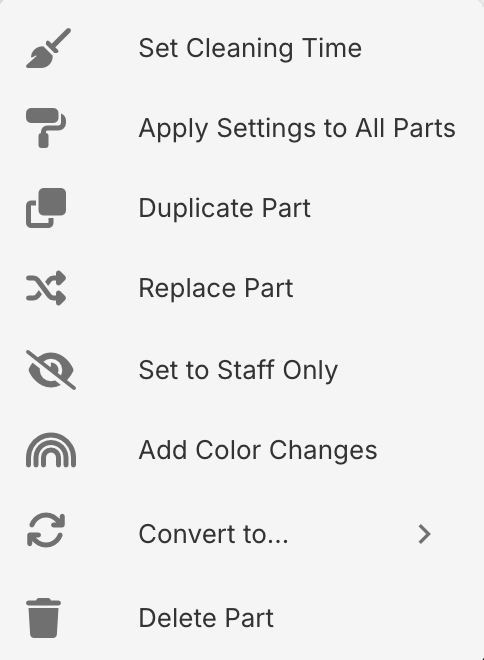
Set Cleaning Time: Manually override the estimated cleaning timeThe estimated or manually assigned amount of labor required to post-process a model. Cleaning time can be set per model and directly affects pricing when applicable. for this model. This is especially useful for technologies like SLA, where cleaning requirements can vary. As you adjust the time, the price will update live before you even hit “Done.”
Apply Settings to All Parts: Instantly apply the current material and property settings (from the Options tab) to every model in the project. A great time-saver when producing a batch of identical parts.
Duplicate Part: Makes a copy of the current part — ideal when printing the same model with different materials or print settings.
Replace Part: Need to swap in a new version mid-project? Just click Replace Part to upload a new file. Whether you're quoting or in production, Formfactories keeps the previous versions saved in the background — so you never lose track of revisions. Don't forget to update or delete old job filesA file that gets sent to a machine to make a model (like a .3MF, .gcode, etc.).Learn more → when you do this.
Set to Staff Only: Hides this model from clients and removes any pricing (if applicable). Staff only modelsA model that is hidden from clients and excluded from client-facing pricing and views. These models are visible only to staff members and are commonly used for internal parts like jigs, test pieces, or setup aids. Models added to a project in in the production status are automatically marked as staff only. are perfect for behind-the-scenes files like, jigs, setup models, or anything else that shouldn’t show up in the client-facing view. If your project is already in the production status, models added later will default to Staff Only — since pricing has likely already been locked in.
Add Color Changes: Useful for FDM printing when you want to flag a color switch at a specific layer height. While this feature is a bit simpler than what slicer software offers, it’s handy for coordinating mid-print pauses.
Convert to: Use this to assign a model a different role (such as turning it into an attachmentGeneral supporting materials, like PDFs, drawings, spec sheets, certifications, etc.). This removes it from the section entierly.
Delete Part: Removes the model from the project. The history or chat portion of the project will preserve the deleted model.
Model Tags
Next is the Tags icon. Click it to assign an existing tag to the model or create a new one. Tags are a powerful way to streamline your workflow, organize projects, and improve dashboard filtering. Learn more about tags here.
Enlarge Icon
Click the enlarge icon to open a full-screen view of the model. From there, you can rotate the model, view a cross-section, and adjust opacity to reveal internal features.
Download Arrow
Beneath the enlarge icon is a downward-pointing arrow. Clicking this will download the current 3D model. When you hover over the arrow, a second icon will appear, providing access to the version history. Here, you can find native files (such as a SolidWorks file before the software converted it to a mesh), along with any previous versions of the model prior to the current revision.
Model Units and Size
At the bottom of this pane for a model, you’ll see the unit of measurement. By default, the software assumes millimeters, but you can switch to inches or centimeters as needed. The resulting dimensions of the model are displayed to the right.
Options/ Production Pane
In the middle pane, you’ll see two tabs, Options and Production.
Options Tab
The options tab is where all callouts—such as material and property selections—are made. This is the default tab that's shown if the project is in the NewThe default status when a project is first created. Clients see limited information in this stage. Manual pricing and checkout options are hidden, though any instantly quoted parts will still display their prices. or Quoted / In PreparationUsed when a project is awaiting approval. If pricing is enabled, the status appears as Quoted; if not, it appears as In Preparation. Clients can view pricing (if applicable) and perform a checkout at this stage. phase.
Production Tab
Next is the production tab, which displays the quantity being produced, as well as the quantity already counted. Additional stages of production can be customized using tags. Counts can be manually updated here, and all staff members will see these updates in real time. This is also where you’ll find a link to any job filesA file that gets sent to a machine to make a model (like a .3MF, .gcode, etc.).Learn more → or attachmentsGeneral supporting materials, like PDFs, drawings, spec sheets, certifications, etc. that are associated with this model.
Part Summary Pane
The third and rightmost pane for a model is the Part Summary Pane. Here, you’ll find a summary of all callouts for the model, including the technology, material, and all selected properties. It also displays the total quantity of parts to be produced, as well as the price per model—particularly useful if you’re in the business of selling parts.
You’ll also see the chat icon, which opens up the model’s chatroom. We'll talk more about this in the Chatroom, History, Workspace section below.
Placeholder Models
Placeholder modelsA model that is used as a placeholder for something that has yet to be designed. It can be used to track production of offline models that are stored locally vs uploaded to the cloud. can be used to track production of offline models that are stored locally vs uploaded to the cloud, or as a placeholder for something that has yet to be designed.Project Footer
At the bottom of a project, you'll a pricing summary (if applicable), and Upload Files button (an alternative to dragging and dropping) and an + Add Item/Service button.
The Item/Service button is used for offerings that are not set up in your Materials and CapabilitiesMaterials and Capabilities. It's a convient way to add line items to your project that aren't used frequently across your workflow.
Chatroom, History, Workspace
While represented by a single bubble icon, there’s a lot happening within the chat interface—both at the model level and at the project level for staff and customers.
Chatroom
The chatroom allows your team to communicate about a specific model or project. Using the @ symbol to mention someone will trigger a notification at the top of their screen, including a message preview. Clicking it takes them directly to the relevant model or project, saving time and ensuring everyone has full context.
In the bottom left of the chat, you’ll find the attachment button. Hovering over it reveals an additional button for searching and inserting GIFs—because sometimes a well-timed GIF says more than text ever could.
Three Types of Chatrooms
Each project includes three distinct chatrooms:
Model-Level Chatroom
Focused on a specific model. Pings bring users directly to that model.
Not visible to customers.Staff Project Chat
A project-wide chatroom for internal team discussions.
Not visible to customers.Customer Chatroom
The only chatroom visible to clients.
If an email is sent through the system (either manually or automatically), it is logged in the customer chatroom. You can click the log to view the actual email content.
If a customer doesn’t interact with the chat after a message is sent, the system will automatically email them the message. They can reply via email, and their response will appear in the chat. Or they may log in and continue the conversation there.
This shared space ensures that communication is transparent and accessible to all relevant team members, rather than siloed in someone’s inbox—especially critical when team members are unavailable or coverage is needed.
Activity History
Chatrooms also double as the activity history for both models and projects. Any time an event occurs—like changing the quantity of parts to be produced or moving a project from Quoted to In Production—the software logs who did what and when. These logs appear right alongside team conversations, and you can filter between chat and activity using the gear icon in the top-right corner.
Workspace
Within project-level chatrooms (both staff and customer), you’ll also find the Workspace.
At its simplest, it’s a place to create and track to-do items. For staff chatrooms, these items will also appear on the production dashboard views.
But Workspaces can be much more powerful:
- Each task can include its own comment thread
- Tasks can be assigned to team members using tags
- Priorities like “Urgent” can be applied
- Tasks can be linked to projects, parts, or machines
- You can attach files or insert hyperlinks
- Tasks can even be converted into other elements like headings or notes
At its most advanced, a Workspace becomes a collaborative whiteboard, where teams can combine structure and freeform thinking—using headings, text, and dynamic components to organize everything in one place.